Railroad Forums 

  • WMATA 1K Series Rollsign

  • Discussion related to DC area passenger rail services from Northern Virginia to Baltimore, MD. Includes Light Rail and Baltimore Subway.
Discussion related to DC area passenger rail services from Northern Virginia to Baltimore, MD. Includes Light Rail and Baltimore Subway.

Moderators: mtuandrew, therock, Robert Paniagua

 #1407700  by Sand Box John
 
"smallfire85"
I'll see what I can do about those measurements.


Thank You.

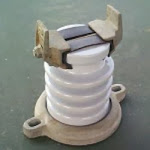
One thing I'm trying to find out is if these rolls were modified any further after any of the new extensions (Like Shady Grove) or the opening of the Yellow Line down to Huntington in 1983 or in anticipation of the Green Line in 1991. Did they just try to keep the 1000 cars off those routes before they updated the signage? Seems pretty difficult to do.

WMATA as I recall changed out the roll signs for flip dots before the cars received their midlife rehabilitation in the mid 1990s. I was at the Yellow line opening to Huntington on 12 17 1983, I don't recall anything special about the signs on the 1k cars back then. I will also note that the 2k cars made their public debut on the same day in a static display parked at the platform on track C2. The truncated roll sign I linked to above was shorter as it did not have as many blank places on it compared to yours. I Think we can safely say the rolls were modified at least twice before being replaced by the flip dots. I think WMATA used its in house silk screen shop that was used for maintaining the roll signs on their buses, as the buses were still using roll signs well after flip dots were installed on the 1k cars.
 #1408879  by smallfire85
 
Sand Box John wrote:
I would love to recreate the art work for the signs. I have the colors, I have the font. what I don't have is the measurements.
Here you go. I've added a couple extra measurements to assist:

Roll width: 36-29/32”
Distance between left edge of sign and roll: 1-3/32”
Distance between right edge of sign and roll: 1-5/32”
Sign width: 34 21/32” Sign height: 6-23/32”
Sign text height: 3”
Distance between bottom of flat bottom font to bottom of sign: 2-1/32”
Strip map font height: ½”
Strip map line width: ⅛”
Strip map bullet diameter: ¼”
Strip map line length: 28-¾” short, 30” med, 30-1/2" long (varies based on number of stations)
Distance from first strip map bullet to side of sign: 1-⅛”
Line color bullet diameter: 9/16”
Distance between bottom of strip map line to bottom of sign: ¾”
Distance between square corner font and strip map bullet: ¼” vertical to strip map line; flat bottom of text is angled 45° to the line and passes through the center of the corresponding bullet.
Code short strip (Read Enable Bar) height, width: 2-⅛” x 9/32”
Code long strip height, width (Code Value (CV) Bar): 3-9/32” x ¼”
Code block height, width (Sign Position Stop): ¼” x ⅛”
Distance between roll edge and short strip: 9/32”
Distance between strips and or block: Read Enable to Position Stop: 13/32”; Position Stop to CV: ¼”; Between CV's ¼”
Distance between interior and exterior signs: 5-⅛”
Distance between adjacent signs: 13/16”

For the sign code bar, the arrangement is as follows from left to right: Read Enable; Sign Position Stop; CV Parity; CV 1; CV 2; CV 4; CV 8; CV 10; CV 20; CV 40. I will talk more about the purpose for each later.
 #1408896  by Sand Box John
 
"smallfire85"

Here you go. I've added a couple extra measurements to assist:

Roll width: 36-29/32”
Distance between left edge of sign and roll: 1-3/32”
Distance between right edge of sign and roll: 1-5/32”
Sign width: 34 21/32” Sign height: 6-23/32”
Sign text height: 3”
Distance between bottom of flat bottom font to bottom of sign: 2-1/32”
Strip map font height: ½”
Strip map line width: ⅛”
Strip map bullet diameter: ¼”
Strip map line length: 28-¾” short, 30” med, 30-1/2" long (varies based on number of stations)
Distance from first strip map bullet to side of sign: 1-⅛”
Line color bullet diameter: 9/16”
Distance between bottom of strip map line to bottom of sign: ¾”
Distance between square corner font and strip map bullet: ¼” vertical to strip map line; flat bottom of text is angled 45° to the line and passes through the center of the corresponding bullet.
Code short strip (Read Enable Bar) height, width: 2-⅛” x 9/32”
Code long strip height, width (Code Value (CV) Bar): 3-9/32” x ¼”
Code block height, width (Sign Position Stop): ¼” x ⅛”
Distance between roll edge and short strip: 9/32”
Distance between strips and or block: Read Enable to Position Stop: 13/32”; Position Stop to CV: ¼”; Between CV's ¼”
Distance between interior and exterior signs: 5-⅛”
Distance between adjacent signs: 13/16”

For the sign code bar, the arrangement is as follows from left to right: Read Enable; Sign Position Stop; CV Parity; CV 1; CV 2; CV 4; CV 8; CV 10; CV 20; CV 40. I will talk more about the purpose for each later.


You are officially the man !
Thank you very, very much !


I now have a tough decision to make, Should I plow on correcting errors and updating my the track map for the purpose of publishing in DXF format (PNG format map is getting same treatment) or should I jump into creating the artwork for a revision 7 roll sign.
 #1409094  by wrivlin
 
Sand Box John wrote:
I now have a tough decision to make, Should I plow on correcting errors and updating my the track map for the purpose of publishing in DXF format (PNG format map is getting same treatment) or should I jump into creating the artwork for a revision 7 roll sign.

I converted the part of your track map it to vector format a while ago. I'd be glad to send what I have to you.
 #1409138  by Sand Box John
 
"wrivlin"

I converted the part of your track map it to vector format a while ago. I'd be glad to send what I have to you.


PM me the link to the file, I'm curious as to what it looks like. I'm also curious what tool you used.
 #1409238  by smallfire85
 
Sand Box John wrote: Thank you very, very much !

I now have a tough decision to make, Should I plow on correcting errors and updating my the track map for the purpose of publishing in DXF format (PNG format map is getting same treatment) or should I jump into creating the artwork for a revision 7 roll sign.
It's truly a pleasure to assist you. I hope you plan to write a book with all the knowledge you've accumulated.

Now about the signs:

The way these signs work is that the destination code first gets set in the cab. The signal is then sent to the signs via the trainlines. Each sign then compares the value coming in on the trainlines (A) to the value of the code presently set to be read on the roll (B) and rolls the sign accordingly: forward if A>B and backward if A<B. When A=B, the power to the motors are reduced, which makes the roll creep until the Position Stop code is read, which stops the motors.

As SBJ mentioned earlier, the Read Enable tells the sign to read the CV bars. This is to ensure that any letters that pass over the CV sensors don't register as a false code.

The Position Stop tells the system when a given sign is in proper position and to stop the motors.

The CV bars 1 through 40 tells the system the destination code of a given sign. This is basically the sum of whichever CV bars are present, i.e., CV 1, CV 4, and CV 10 makes the sign code 15 (Ballston on this sign).

The CV Parity is a sanity check on the system. it is literally the sum of CV bars present in the sign code. If it is an odd number of lines, the bar is present. If even, it is blank. Taking Ballston, for example, there are three CV lines (1, 4, & 10), so the Parity bar is present. The sign also does a count of the active CV trainline inputs and applies the same logic of the CV parity bar. Therefore, the trainline parity value must match the CV Parity value in order for the sign to accept a code on the curtain.

I hope that wasn't too confusing. There are also other measures installed that are supposed to prevent the most common types of issues found in this type of setup, such as a motor stop if the sign receives no trainline inputs, or a motor stop when the sign reads a end curtain reading or a code of 51, which is the high end of the roll.

I hope this isn't too off topic for the DC Area forum.
 #1409373  by Sand Box John
 
"smallfire85"
It's truly a pleasure to assist you. I hope you plan to write a book with all the knowledge you've accumulated.


If I had the time and money I would to love to do it. Fact is I need to spend some time gathering reams of other information to cover most everything to satisfy myself. Doing that would require a lot of leg work.

Now about the signs:

The way these signs work is that the destination code first gets set in the cab. The signal is then sent to the signs via the trainlines. Each sign then compares the value coming in on the trainlines (A) to the value of the code presently set to be read on the roll (B) and rolls the sign accordingly: forward if A>B and backward if A<B. When A=B, the power to the motors are reduced, which makes the roll creep until the Position Stop code is read, which stops the motors.

As SBJ mentioned earlier, the Read Enable tells the sign to read the CV bars. This is to ensure that any letters that pass over the CV sensors don't register as a false code.

The Position Stop tells the system when a given sign is in proper position and to stop the motors.

The CV bars 1 through 40 tells the system the destination code of a given sign. This is basically the sum of whichever CV bars are present, i.e., CV 1, CV 4, and CV 10 makes the sign code 15 (Ballston on this sign).

The CV Parity is a sanity check on the system. it is literally the sum of CV bars present in the sign code. If it is an odd number of lines, the bar is present. If even, it is blank. Taking Ballston, for example, there are three CV lines (1, 4, & 10), so the Parity bar is present. The sign also does a count of the active CV trainline inputs and applies the same logic of the CV parity bar. Therefore, the trainline parity value must match the CV Parity value in order for the sign to accept a code on the curtain.

I hope that wasn't too confusing. There are also other measures installed that are supposed to prevent the most common types of issues found in this type of setup, such as a motor stop if the sign receives no trainline inputs, or a motor stop when the sign reads a end curtain reading or a code of 51, which is the high end of the roll.


I have been noodling this in my head during the middle of this past week, Your description on how the appropriate sign is found and set is pretty much what I came up with.

I hope this isn't too off topic for the DC Area forum.

You're describing a piece of WMATA legacy hardware, making it totally on topic.
 #1410867  by Robert Paniagua
 
Sand Box John wrote:"JDC"
Modern technology is amazing, of course. LED destination signs? No big deal. But what really fascinates me is how this early technology worked (and I presume worked well). Roll signs that automatically scrolled to display the correct destination? Very cool.


The technology did in fact work well. However the way it was implemented created issues that gave WMATA problems almost from the beginning.The rolls were extremely long causing mechanical issues that resulted in malfunctions. The bar codes scanners used to find the places on the rolls would sometimes act stupid and run the rolls from end to end to end . . . until the motor burned out. The terminal pairs were not always place on the rolls closes to each other reducing search time. On two occasion I saw rolls that were torn apart. Prior to their abandonment and replacement with flip dots WMATA truncated them down to only having the active short turn and final terminal stations on them.This increase the reliability considerably but the decision to replace with flip dots had been made.

I would have love to have seen WMATA spec LCD displays in the 7k cars that would have mimicked the origenal roll signs on the 1k cars, both interior and exterior.
yes, In fact, according to the book "THE STORY OF METRO", I saw a paragraph that says the the Mylar 1K rollsigns had too many destinations that it could cause the motor of the rollsign changer to burn out so that's why they converted to the much more reliable same LED Flip Dot signs the 2Ks and 3Ks introduced from 1985-87, and I like the flip dot signs better
 #1411155  by Sand Box John
 
I think I have created a reasonable facsimile.

Image
52 New Carrollton Silver

I did have to make one compromise, in order to fit the station names within the right margin of the strip map, I had to reduce the text height from 1/2 to 15/32.

@ smallfire85, Did I get the CV strip in the correct position? CV 2, 10 and 40.

I am going the save it in DXF format and take it over to Dicarlo Digital Copy Center in Salisbury and have them print it on some 20 lb bond to see what it looks like full size.
 #1411385  by Sand Box John
 
Corrected some errors:

.5" fount was reduced to 0.45197" to fit the right margin.

Image
 #1411443  by smallfire85
 
Sand Box John wrote:I think I have created a reasonable facsimile.


52 New Carrollton Silver

I did have to make one compromise, in order to fit the station names within the right margin of the strip map, I had to reduce the text height from 1/2 to 15/32.

@ smallfire85, Did I get the CV strip in the correct position? CV 2, 10 and 40.

I am going the save it in DXF format and take it over to Dicarlo Digital Copy Center in Salisbury and have them print it on some 20 lb bond to see what it looks like full size.
Looks wonderful!

For the barcode, is the CV2 the second or third bar in order? Basically you should be able to fit 2 CV lines to the left of the CV2 for CVParity and CV1 (from left to right). Also, you would include the CVParity on this reading since there are an odd number (3) of numeric CV values used for the code. So the order of the long bars would be as such from left to right: on; off; on; off; off; on; off; on
 #1411498  by smallfire85
 
SBJ,

Looking at my roll, I would say that the background for the strip map should be a dark brown, Metro brown or slightly darker. Also, I would recommend using white lettering for the exterior "New Carrollton" sign, especially if your background is closer to a light gray. That is most likely what would've been used; NYCT uses white on gray for their gray colored lines.

Anyway, it is your creation to do as you please. I've contemplated taking my roll to a print shop capable of this kind of work and adding stations and routes to the blank sections.

Also, I just realized that the order of stations on your strip map should be reversed. The final destination should be at the right end of the strip map (Ashburn -> New Carrollton).
 #1411542  by Sand Box John
 
"smallfire85"

Looks wonderful!

For the barcode, is the CV2 the second or third bar in order? Basically you should be able to fit 2 CV lines to the left of the CV2 for CVParity and CV1 (from left to right). Also, you would include the CVParity on this reading since there are an odd number (3) of numeric CV values used for the code. So the order of the long bars would be as such from left to right: on; off; on; off; off; on; off; on


LIke this?;
Image

Strips are identifies as thus?;
Image

I noticed that the combination of CV strips can only produce sums up to 79. I will assume a destination code above that will set the roll to No Passengers by default.

Looking at my roll, I would say that the background for the strip map should be a dark brown, Metro brown or slightly darker. Also, I would recommend using white lettering for the exterior "New Carrollton" sign, especially if your background is closer to a light gray. That is most likely what would've been used; NYCT uses white on gray for their gray colored lines.

The brown is the RGB version of the Pantone Metro brown from the WMATA graphics manual. I chose black as the brighter colored, Orange and Yellow, exterior signs are also black. The gray (silver) was lifted from the system map.

Anyway, it is your creation to do as you please. I've contemplated taking my roll to a print shop capable of this kind of work and adding stations and routes to the blank sections.

Expect to pay something in the neighborhood $5.00 square foot. Don't know if contemporary inkjet printers are capable of printing on the Mylar. The rolls were done using silkscreen printing.

Also, I just realized that the order of stations on your strip map should be reversed. The final destination should be at the right end of the strip map (Ashburn -> New Carrollton).

Solved that by doing this.
Image