• A surprisingly easy project - "Sweep" kitbash

  • Discussion related to everything about model railroading, from layout design and planning, to reviews of related model tools and equipment. Discussion includes O, S, HO, N and Z, as well as narrow gauge topics. Also includes discussion of traditional "toy train" and "collector" topics such as Lionel, American Flyer, Marx, and others. Also includes discussion of outdoor garden railways and live steamers.
Discussion related to everything about model railroading, from layout design and planning, to reviews of related model tools and equipment. Discussion includes O, S, HO, N and Z, as well as narrow gauge topics. Also includes discussion of traditional "toy train" and "collector" topics such as Lionel, American Flyer, Marx, and others. Also includes discussion of outdoor garden railways and live steamers.

Moderators: 3rdrail, stilson4283, Otto Vondrak

  by FiatFan
 
I have a somewhat different project today. A while back, I was browsing through Railroad Picture Archives.NET when I stumbled upon this creature. It's called a "sweep." It combines the chassis/cab of an SW1200 with the hood of a GP9. Since the image is copyrighted, here's the link.

Canac 7103 "Sweep"

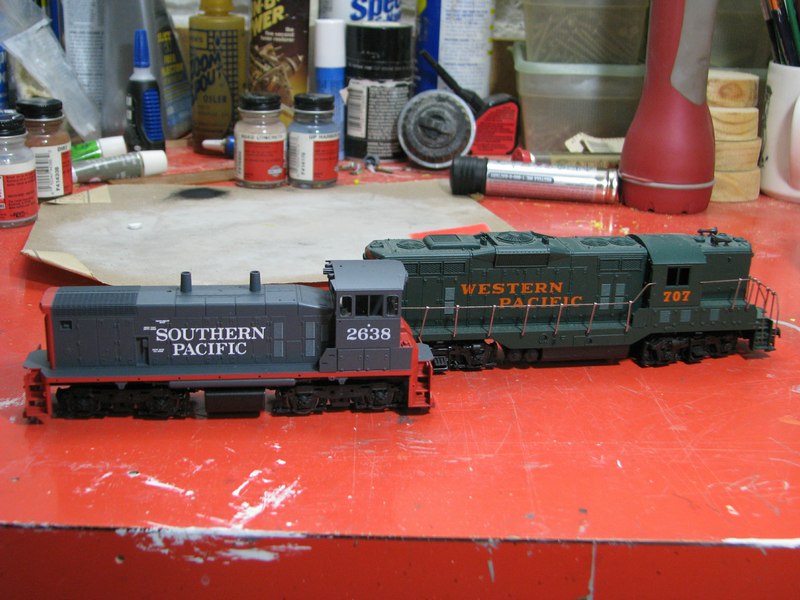
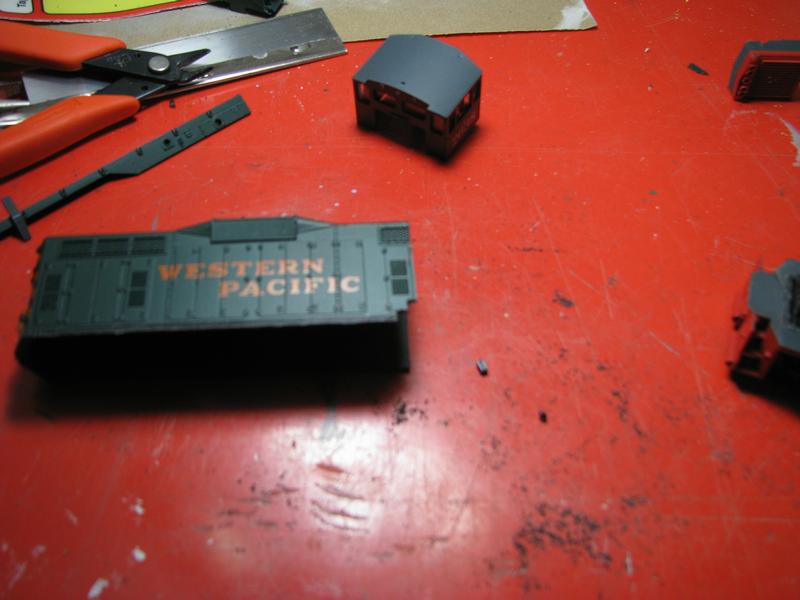
I decided I had to have one, right now. Since I didn't have an SW1200 I substituted an SW1500 which I had purchased last summer simply because it was so inexpensive. I also had a dummy GP9. Here are the victi... er, uh, volunteers.

Image

First I removed a portion of the front of the SW1500 and chopped the stacks off. You'll see the reason in a moment. I also cut off a portion of the hood from the GP9.

Image

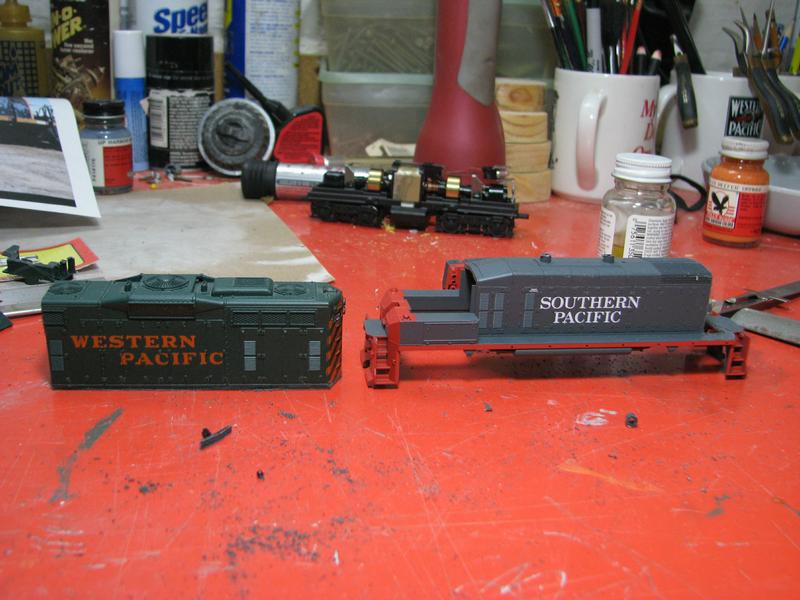
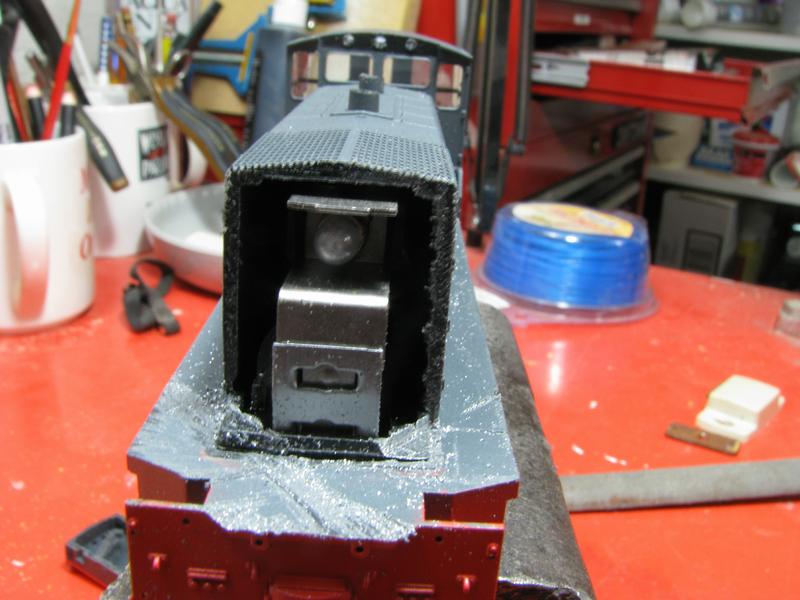
Here's the time-saving step. The GP9 was an old Athearn wide body. Without the stacks on the SW1500 I was able to slip the hood of the GP9 over the hood of the SW1500. This saved me quite a bit of time since I didn't have to remove the hood of the SW1500. It also maintained a great deal of structural integrity.

Image


Then I notched out the hood on the GP9 to allow for the steps on the SW1500.

Image

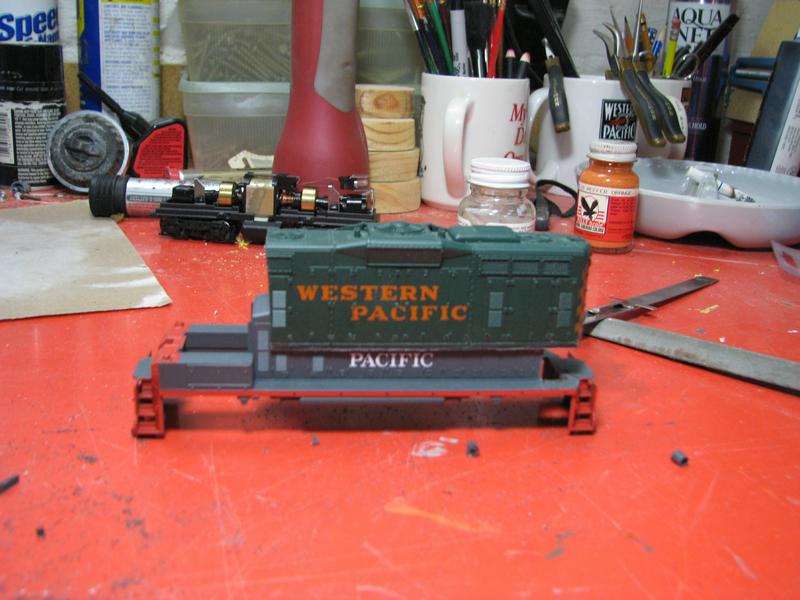
Next is where I made a mistake. All of my trial fittings had been on the body only without the chassis installed. Once I had the chassis installed, I discovered that I needed to mill off a small triangular portion of the frame to allow the body to fit. If you do this project, you may want to cut the GP9 hood just a little longer. On the other hand, cutting of portions of the frame only added about 5 minutes to the project.

Image

Here's the completed project.

Image

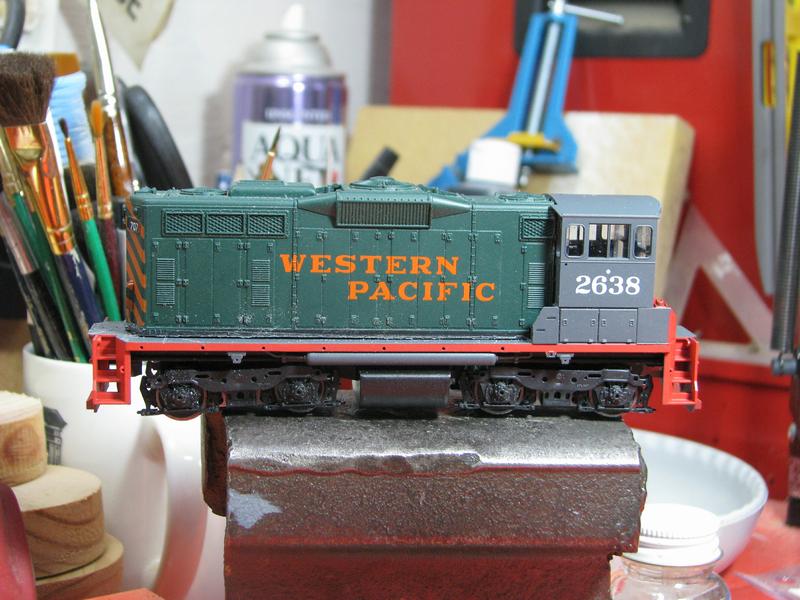
Total time from the first picture to the last was 1 hour and 15 minutes. It still needs to go to the paint shop, get handrails and couplers, and tune the chassis. Obviously it's not complete yet and one could spend hours adding details, re-motoring, re-gearing, etc., but it was a fun and easy project. One could also use a more accurately scaled hood for the GP9 and it really wouldn't add much time to the project.

Tom
  by Otto Vondrak
 
Tom- thanks for sharing your kitbash project with us! Keep us posted and show us the next steps when this unique model heads for the paint shops!

-otto-
  by jmp883
 
And I thought I had seen it all when I saw photos of Santa Fe's BEEP switcher (a Baldwin cab and frame with a GP-7 hood and prime mover)! Excellent work on the kitbash!
  by FiatFan
 
Well, I got it done, such as it is. Here's my "sweep" switching a car into Puppy's Pet Products.

Image

Lessons learned:

1. Use a good quality tape and make sure it's snug against the surface when masking off areas for painting.

2. Paint is not a hole filler.

3. Accu Flex #16-601 is not flat. It dries to a nice gloss which would make a nice surface for applying decals.

4. I wish I would have known about step 3 before I put the decals on.

5. Do NOT use 40 year old decals. They have turned yellow. Buy some new ones!

6. Do not blow on decals while they are still wet with solvaset. They will disappear at hypersonic speeds.

7. Don't rush the painting. Take time to follow the steps above.

8. Using Pearls Drops or other gritty tooth paste really does smooth out an Athearn drive. It also leaves the drive train minty fresh.


Tom
  by Otto Vondrak
 
FiatFan wrote:2. Paint is not a hole filler.
That was the hardest lesson for me to learn. In fact, paint makes every defect on the shell come alive! Did you use a primer coat first?

-otto-
  by FiatFan
 
Otto Vondrak wrote:
FiatFan wrote:2. Paint is not a hole filler.
That was the hardest lesson for me to learn. In fact, paint makes every defect on the shell come alive! Did you use a primer coat first?

-otto-
Yes, I did. I think next time I may put on a coat of primer just to see where the problems are.

Considering it was my first locomotive bash ever I think it came out ok. It also showed me there is a lot more to learn.

Tom
  by 3rdrail
 
Nice job !

I heard a painting trick from Tony Tieuli that seems to make sense. Mask and spray (or brush) your primary color first. Afterwards, mask for your secondary color - but paint the primary color along the border of the tape where it meets with the primary color's edge. (I would paint right up to the tape's edge so as to not have a situation where the tape pulls the paint away from it's surface when lifted.) Let it thoroughly dry, then paint your secondary color. When you lift the tape, you'll have a sharp line with no bleed-through.

I've just discovered the wonders of aluminum roof sheathing (the thinnest that you can find). I just made a nice pilot coupler-cover for an Alco FA out of a piece that I cut to fit. I sat and watched Chiller Drive-in and at the same time kept bending the stuff with my thumbs ever so much each time until my piece looked like it had come from the factory. I started with a plain old Lionel Alco and with this and some other customizations, it now looks like a million bucks !

What do you guys like for tape ? I've experimented with 3M low-tack tape, but it doesn't seem to have enough stickyness for a good seal. It seems that stickier, though, would lift the previous paint job (??) Thoughts ?
  by graftonterminalrr
 
Very, very nice job! I'm originally from Nova Scotia and, during the 1980s and 1990s, would visit my grandparents every year in Halifax/Dartmouth. I sometimes saw the prototype SWEEPs switching cars at the Halifax yards.

Your model certainly possesses the SWEEP flavor even though it's not 100% prototypical - an Athearn SW7 would have been a better starting point if 100% accuracy was your goal. But the resulting locomotive looks so good!
  by Marty Feldner
 
3rdrail wrote: What do you guys like for tape ? I've experimented with 3M low-tack tape, but it doesn't seem to have enough stickyness for a good seal. It seems that stickier, though, would lift the previous paint job (??) Thoughts ?
I used to use 3M drafting tape (looks like regular masking tape, but thinner and less tack). Since I made the switch to CAD, I wasn't even sure the stuff was still made. A quick Google showed it still available (Amazon, for one- $7.00 gets you enough to last a lifetime.

I also have some of the newer blue painters tape that I planned to experiment with; has anyone tried it?
  by 3rdrail
 
The blue tape is probably the low tack tape that I was referring to. It's ok, but if I use it again, I'm going to use that paint up the edge trick as it doesn't seem to have a tight seal.
  by FiatFan
 
The blue tape is what I used and it really doesn't conform to the details where thinner, more flexible tape might. Since it's so thick, it also left a ridge between the color lines.

Tom